Block Editor
The Block Editor allows you to edit the entities in the block definitions in your drawing. It displays the selected block in a separate drawing window, with a new menu item called Block Editor. Once you have finished editing the block, you can close the window or use the Save option.
Starting the Block Editor
There are five ways to activate the Block Editor:
|
Method
|
Description
|
|
From the drawing
|
Select a block insert entity in the drawing, then right-click and choose Edit Block Definition.
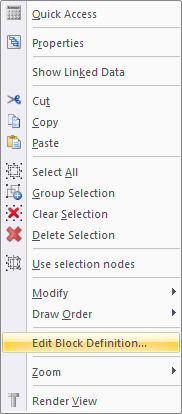
The Block Editor window displays with the selected block entities.
|
|
From the Block Manager
|
Select a block in the list and then right-click and choose Edit Block.
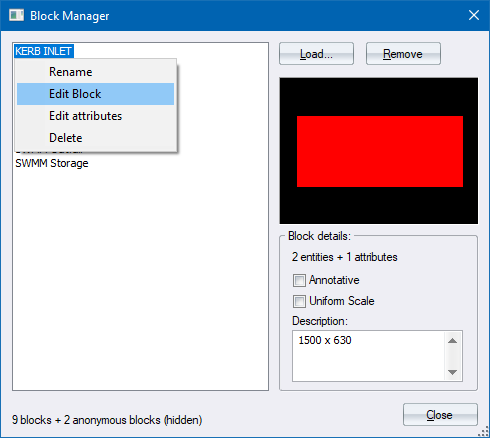
The Block Manager closes and the Block Editor window displasd with the selected block entities.
|
|
From the Control Centre
|
Select the Drawing tab, then select Blocks from the list of object types on the left.
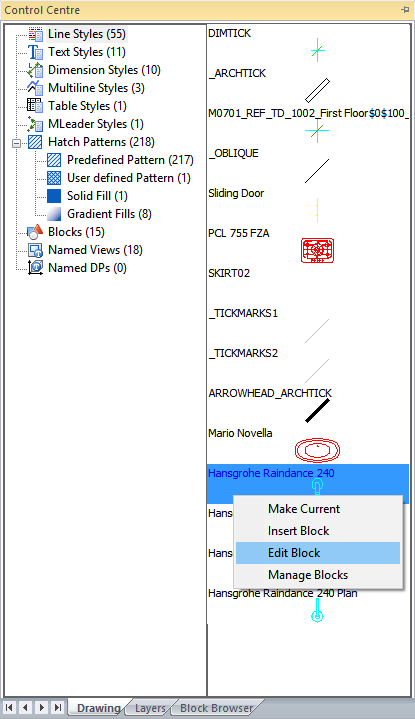
Right-click on one of the blocks listed, and choose Edit Block from the popup menu.
|
|
From the Applications menu or the Applications toolbar
|
Select the Block Editor menu option from the Applications menu, or click the Block Editor icon. The Block Manager displays with a list of blocks.
Select the block to edit from the list, and then click Select Block.
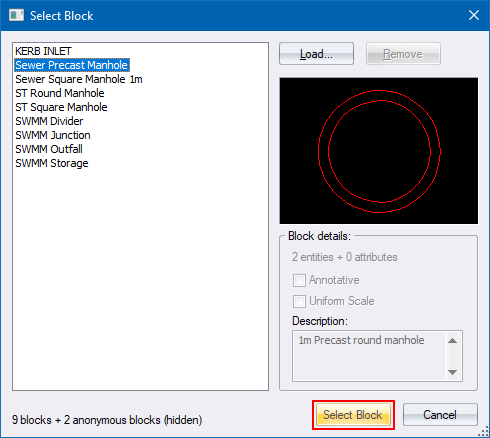
The Block Manager closes and the Block Editor window displays with the selected block entities.
|
The Block Editor window has some distinguishing features to differentiate it from a “normal” drawing window.
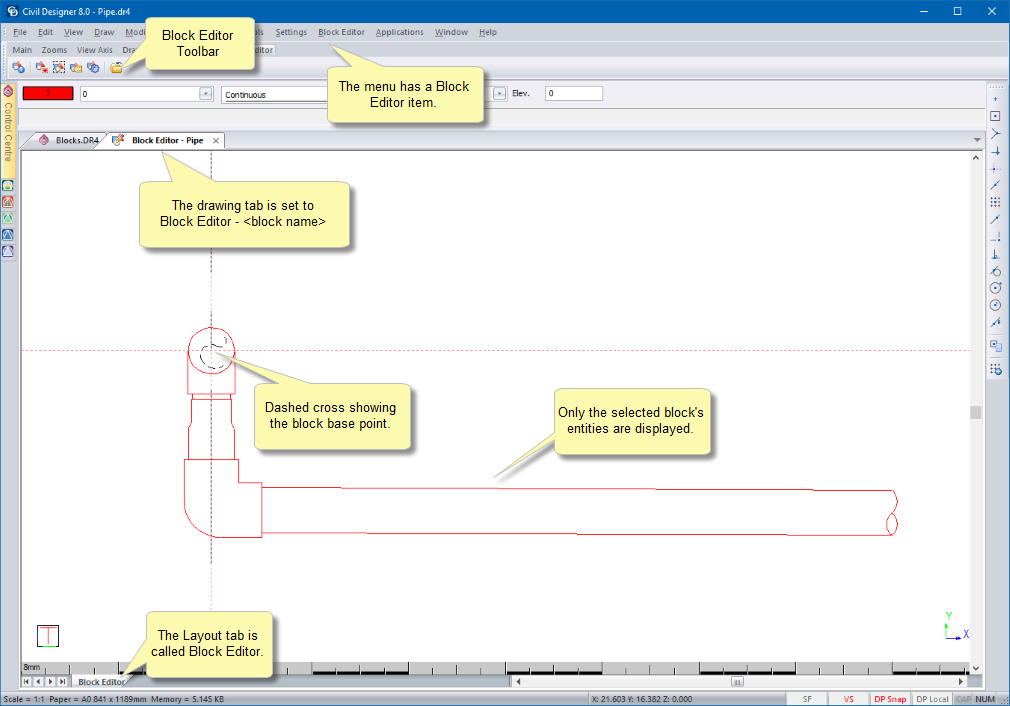
-
The Drawing tab is set to Block Editor - <block name>.
-
The Block Editor toolbar displays.
-
The main menu has a Block Editor item.
-
The paper rectangle is replaced with a dashed cross indicating the block “base point” (origin).
Editing Entities in the Block Editor
You can edit entities in the Block Editor exactly as you would in a normal CAD window. In addition, there is a Block Editor menu and toolbar that provides functions specific to the Block Editor:
|
Icon
|
Name
|
Command
|
Description
|
|

|
Block Editor Help
|
BE_HELP
|
Displays this help document.
|
|

|
Set Block Base Point
|
BE_SETBASE
|
Used to set the origin/hook point of the block.
|
|

|
Set Block Snip Rectangle
|
BE_SETSNIPRECT
|
Used to define the snip rectangle for the block. (optional).
|
|

|
Create Attribute
|
BE_CREATEATTRIBUTE
|
Create a new attribute tag in this block.
|
|

|
Apply Changes
|
BE_APPLYCHANGES
|
Applies the changes you have made to the block in the “parent” drawing.
|
|

|
Close Block Editor
|
BE_CLOSE
|
Closes the Block Editor window.
|
If a block contains visibility states, the following functions are available upon right-clicking the block entity in the Block Editor window:
|
|

|
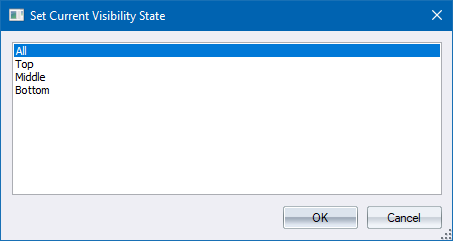
Set Current Visibility State
|
BE_BVSETCURRENTSTATE
|
Allows you to specify the visibility state of the block you want to make current.
|
|

|
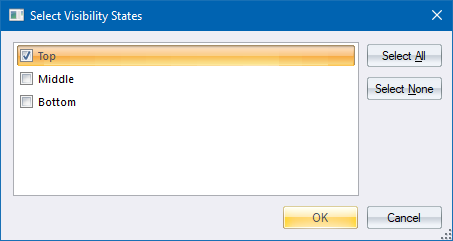
Set Visibility States for Selected Entities
|
BE_BVSETSTATESFORSELECTED
|
Allows you to specify the visibility states you want selected entities to belong to.
|
|

|
Add a New Visibility State
|
BE_BVADDSTATE
|
Allows you to add a new visibility state to the system.
|
|

|
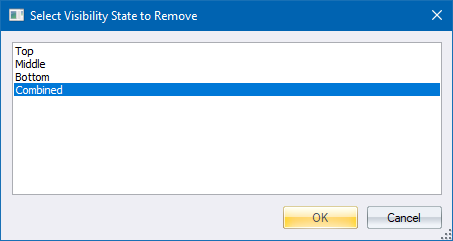
Remove a Visibility State
|
BE_BVREMOVESTATE
|
Allows you to specify a visibility state to delete.
|
Saving Your Changes
- When you close the Block Editor window, you are prompted to save any changes to the block.

-
If you choose to save the changes to the block, the original drawing is updated.
- You can also use the Apply Changes option to manually save your changes at any time.
 You can also use the Block Attribute Editor to edit attributes in both block definitions and block inserts.
Set Block Base Point
Use this function to specify a new base point (origin / hook point) for the block.
-
You are prompted to indicate a new base point.
- Click in the Block Editor window to indicate the base point.
- The block’s entities shift so that the point you indicated is now at the Block Editor window origin (coordinate <0,0,0>).
You are also warned that changing the block’s base point affects the appearance of the block inserts that reference this block. This is because the block’s entities have moved relative to the insert point of these block inserts.
Set Block Snip Rectangle
Use this function to specify an optional snipping rectangle, which can be used to snip out entities behind the block insert when you insert the block.
-
You are prompted to indicate the first (lower left) corner point of the snipping rectangle.
-
Click in the Block Editor window to indicate the first point.
-
You are prompted to indicate the opposite (upper right) corner point of the snipping rectangle.
- Click in the Block Editor window to indicate the second point.
The snipping rectangle you have specified is stored by the block, and can be used when inserting a block in the drawing using the Snip option in the Insert Block CAD Bar.
Block Visibility States
In AllyCAD, block definitions can have multiple visibility states. Each state specifies which entities in the block will be visible in that state.
This function is useful in the following ways:
-
Offers AutoCAD compatibility as drawing graphics match those in AutoCAD.
-
One block can contain many graphical representations.
-
Multiple similar blocks can be combined into one block with multiple visibility states.
-
The number of blocks in the drawing is reduced, making it easier to manage and use blocks.
- Design standards are encapsulated.
Entity selection and intersections are aware of the block insert's current visibility state i.e. they only act on the entities in the block that are visible in the block insert's current visibility state. You can change a block insert's current visibility state in the Properties Bar.
Blocks with visibility states are drawn correctly. The block insert's current visibility state determines which block visibility state is drawn.
Block visibility state data is loaded and saved from/to DWG and DR4 drawings.
Editing Block Visibility States
Switching Between Visibility States in the Block Editor
-
Select a block insert in the drawing, which references a block with visibility states.
-
Right-click and select Edit Block Definition… from the popup context menu.
-
The Block Editor opens as a new drawing window and the entities in the block definition display.
Note how the Drawing tab shows “Block Editor”. The Block Editor menu also becomes the current Main menu.
-
Select Block Editor ► Visibility States ► Set Current Visibility State. A window lists all of the visibility states belonging to this block definition and allows you to choose the visibility state to make current.
-
Double-click the visibility state you want to make current.
-
Only the entities, in the block definition, that have been added to the visibility state you choose display in the Block Editor.
The special option All will make all entities in the block visible.
Note that entity visibility is still dependant on layer visibility settings.
Adding Entities to a Visibility State
-
Select the entities you want to add to a visibility state.
-
Select Block Editor ► Visibility States ► Set Visibility States for Selected Entities.
-
A window displays a list of all the visibility states. The visibility states that already reference one or more of the selected entities will be selected.
-
Select the checkboxes of the visibility states you want the selected entities to belong to.
-
Click OK.
- The selected entities are added to the selected visibility states and are removed from all the unmarked visibility states.
Adding a New Visibility State
-
Select Block Editor ► Visibility States ► Add a new Visibility State.
-
You are prompted to:

-
Enter a descriptive name for the new visibility state. The name must be unique i.e. the block must not contain a visibility state with the same name.
-
Press [Enter] to add the new visibility state to the end of the list of visibility states in this block. The new visibility state contains no entities. You can add entities to it by following the procedure in the “Adding entities to a visibility state” section above.
Removing a Visibility State
-
Select Block Editor ► Visibility States ► Remove a Visibility State.
-
A window lists all of the visibility states belonging to this block definition. Here you can choose the visibility state to remove.
-
Select the visibility state you want to remove and then click OK.
Removing a visibility state in a block definition will affect the appearance of those block inserts in your main drawing that reference this block definition and are set to use this visibility state. These block inserts will be set to show all entities in the block definition.
Saving Your Changes
-
Exit the Block Editor by selecting File ► Close Block Editor or right-clicking and selecting Close Block Editor.
- You are prompted to save your changes to the block.
- Click Yes to save your changes to the block visibility states.