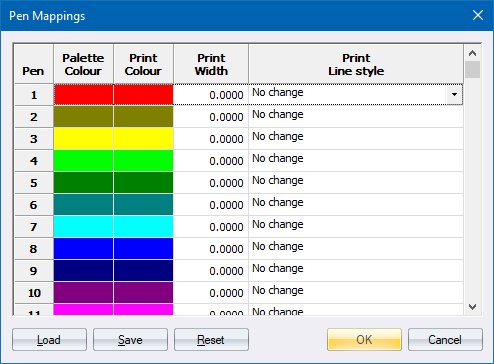

Specify the colour, width and line style to be used when printing. When pen mappings are activated (see the Print and Print Setup options), entities that use a particular pen will print using the mapped colour, width and/or line style instead of those originally specified for the entity. Any combination of the three settings can be made for any of the 256 pens.
 Mapping does not apply to entities drawn using solid colours as these do not have an assigned pen.
|
Option
|
Description |
|
Pen |
Display-only column of the pen numbers that can be changed. |
|
Palette Colour |
Display-only column of the colour assigned to each pen in the current palette. |
|
Print Colour |
Shows the colour mapped to each pen. Right-click a cell to pick the required colour from the standard Colour window. |
|
Print Width |
Shows the width mapped to each pen. Type in the required value in millimetres on paper. A value of 0 will use the predefined width as specified for the entity. |
|
Print Linestyle |
Shows the line style mapped to each pen. Select the required line style from the dropdown list. Selecting No change will use the actual line style as specified for the entity. |
|
Load button |
Click to load a previously saved set of pen mappings. |
|
Save button |
Click to save the current pen mappings in an external file. |
|
Reset button |
Click to clear all mappings that have been made. This returns everything to default settings - print colour matches palette colour, width is 0.0 and line style set to No Change. |