
|
Option
|
Description |
|
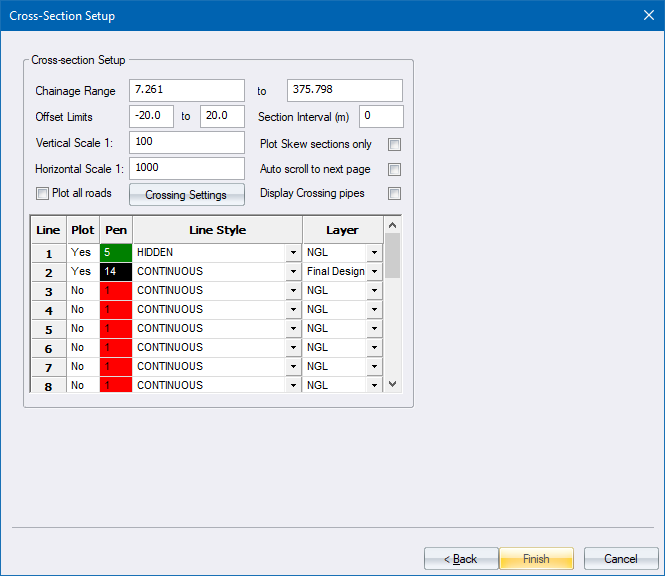
Cross Section Setup |
|
|
Chainage Range |
Enter the start and end chainages for which cross-sections should be plotted. |
|
Offset limits |
Enter the limits left and right of the centre line within which cross-section information should be extracted. Note that offsets left of the centre line must be entered as a negative value. |
|
Section Interval (m) |
Specify the interval between cross-sections. For instance, you can specify an interval of 20m even though the road has been coordinated at 5m intervals. |
|
Vertical scale |
Enter the vertical scale of the plotted cross-section. |
|
Horizontal scale |
Enter the horizontal scale of the plotted cross-section. |
|
Plot all roads |
Select this checkbox to plot the cross-sections of all the roads in the project. |
|
Plot Skew Sections only |
Select this checkbox to only plot cross-sections with non-zero skew angles. |
|
Auto scroll to next page |
Select this checkbox to have new plots automatically generated if the cross-sections in the selected chainage range do not fit on the first sheet. |
|
Crossing Settings button |
Click to display the Crossing Services options, and to specify which crossing services to display on the long section. |
|
Display Crossing pipes |
Select this checkbox to display crossing pipes on cross-sections. The Crossing Services will be displayed when this checkbox is selected. |
|
Table Data |
|
|
Plot column |
Select whether this cross-section line should be plotted (Yes) or not (No). Right-click on the cell to toggle. |
|
Pen column |
Enter the pen number to be used for this cross-section line. Right-click on the cell to access the pen selection. |
|
LT column |
Select the line type to be used for this cross-section line. |
|
Layer column |
Select the road layer from which this cross-section line should be extracted. Right-click on the cell for a list of road layers. |
|
Back Button |
Click to return to the previous page. |
|
Finish Button |
Click to accept the current entries. |
|
Cancel Button |
Click to cancel the function. |